Sunday, 6 April 2014

THE VIOLIN

When I decided to fold my second Joisel's dwarf  I chose the violinist because it is one of my favourite instruments and also because of the dynamism it could give the model. As always, the first step was investigating and selecting a proper model. As far as I know, Joisel didn’t leave instructions for the violin. I only found a CP by Jorge Gracia (zenutrio), published in the AEP internet forum:

The next option I found was Leo Lai’s cello. Both the CP and the final model can be found in his flickr page. If you don’t know it, it is well worth a visit. 

Leo Lai's cello


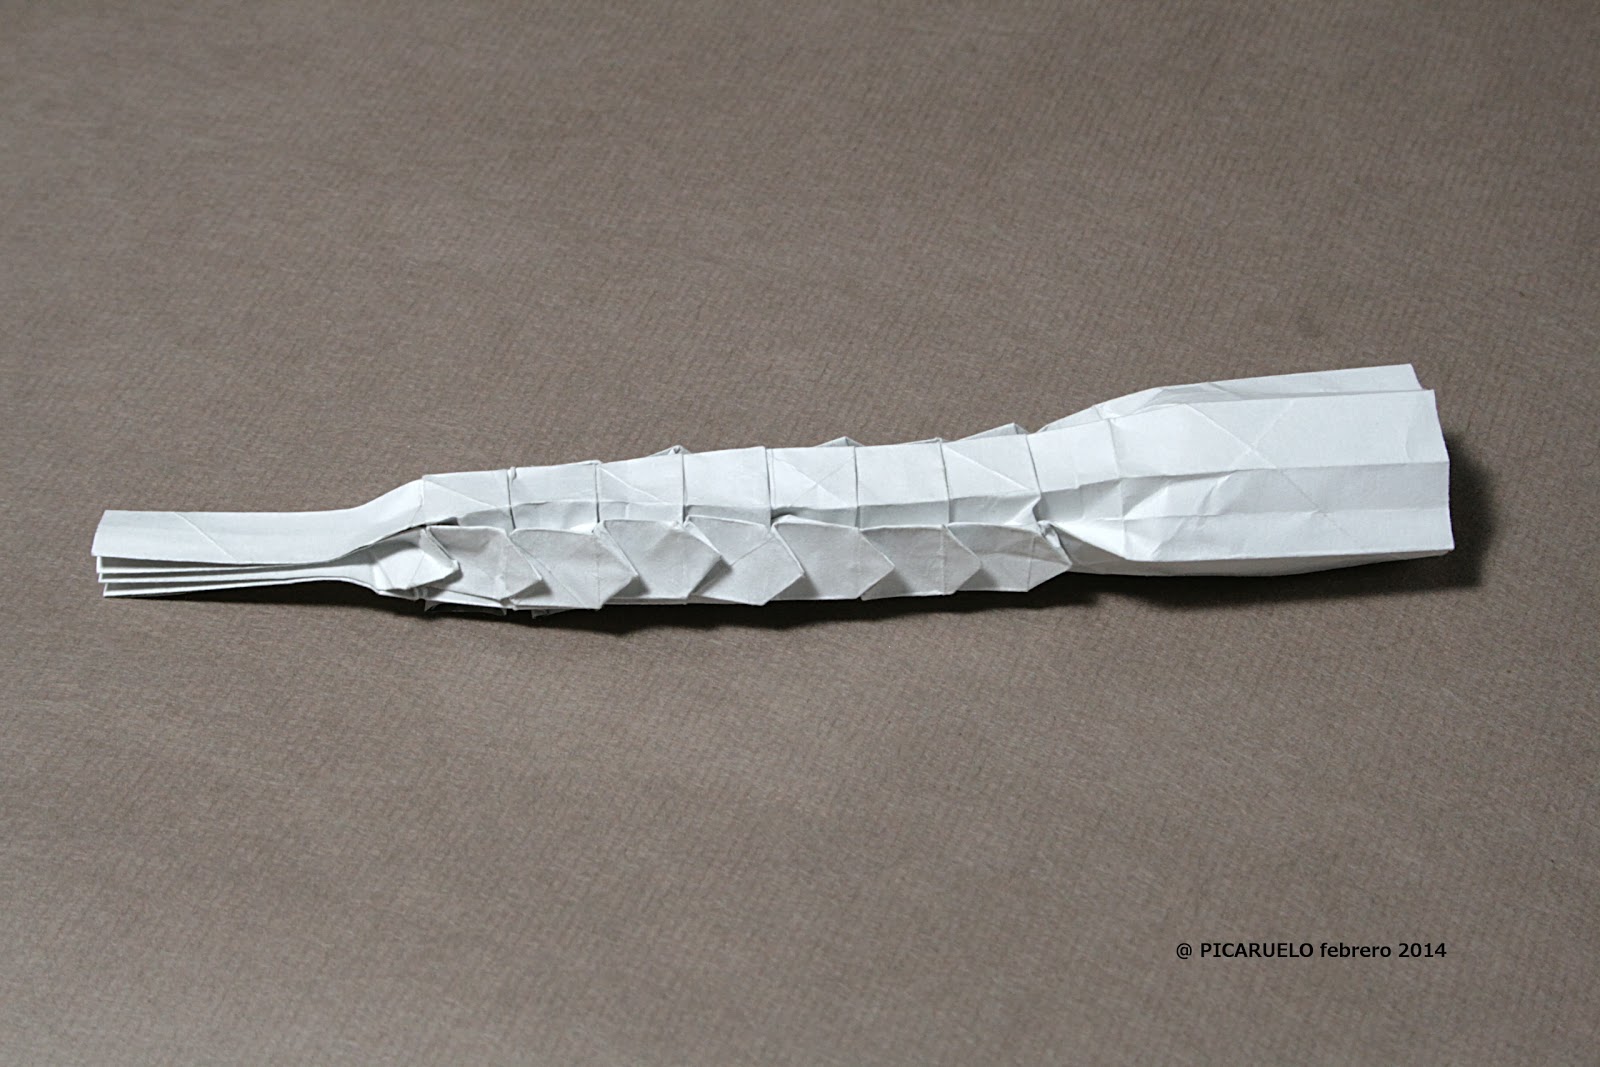
When I analysed the CP I discovered a great design. The bottom of the paper is used to form the cello’s body. The upper part is used to form the strings, neck and scroll of the instrument. It is folded accordion like and then folded down to lay on the body using the string of diamonds in the middle of the paper. This last fold also produces the colour change of the strings, neck and scroll.  

You can see it here in a very preliminary fold I made to see how the CP worked:
The top area is folded accordion like
The top of the paper is folded over the bottom using the line of diamonds
The final model, with a short neck, but useful to learn the folding procedure 
At this point of my investigation I had two options:

  • Trying to fold the original model by Joisel
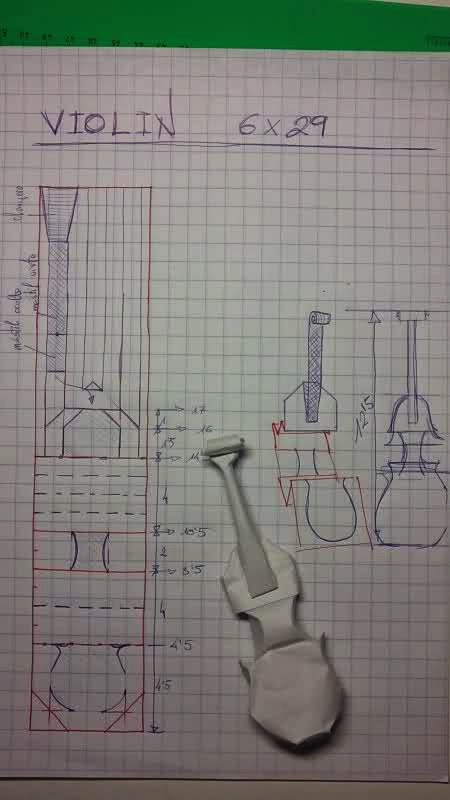
  • Modifying Leo Lai’s design to lenghten the neck and reduce the number of strings from 8 to 4 turning the cello into a violin (although in Leo Lai's folded model you can only see 4 strings, when you fold the published CP you get 8) 

To my delight I found that just a few days before, a wonderful violin design by Gen Hagiwara had been published in the 143th number of the Tanteidan Magazine.
The concept behind this model is the same as in the cello, a long stripe of paper, the bottom to form the body and the top to form the strings, neck and scroll. I only had to choose the proper size of paper (22x5,5 cm), paint it with brown and black water colour and fold it.
My final violin
Although Gen Hagiwara’s violin is beautiful I couldn’t stop thinking about Joisel’s one. So I decided to give it a try. Using Jorge Gracia’s CP I made some small changes, added some detail and ended up with this CP:
Here you can see a simple photo diagram to help you fold the CP as well as a final photo with the violin and the dwarf:


And as a final reflection, I want to give some ideas on how to improve the design even more. The three models, Joisel and Hagiwara’s violins and Leo Lai’s cello are opened.
The back of the violin is hollow
How could a closed violin be designed? A possible solution could be to use a wider stripe so that after folding the body we had more paper left. This paper could be folded to form the back of the violin. I may try it one day if nobody does it before. The model would be spectacular, at least the image of the model I have in my mind!!!!

------------------------------------------------------------------------------------------------------------
19th may -2014

A few days after I released this post an origami friend from Madrid sent me two Eric Joisel's violin CPs. We think that they were on his web. I leave them here as a curiosity. They are very, very similar to the ones I presented in my post. The model in the second photography is simply spectacular.


Monday, 10 March 2014

THE VIOLINIST

I continue with Joisel’s Jazz Band. This time I want to show the whole process to make the dwarf: the documentation process to learn about the model, how I faced the technical problems sometimes arise when you make a model from a CP, the collapsing process and finally, the modeling. This time I chose the violinist. Here is the end result:

 And this is the violin:


After my first musician, with ‘classical’ clothes, I decided to fold the dwarf with the skirt of diamonds. It is probably the most different one and, at least for me, the greatest challenge. The CP was deduced and released by the master Montecinos in his web page


The first difference with the ‘classical’ model is the grid, 28x28 for the classical vs 32x32 for the dwarf with diamonds. That means that the dwarf, once folded will measure 9% less than the first one. I have assumed that this height variation is acceptable for dwarves (¡!) and I have used the same paper size, 60x60 cm.

The second difference are the zig-zag lines at the bottom of the CP that will form the skirt. I knew this crease pattern because I had used it in a former model I designed last year, my ballet dancer. It uses a 16x16 square grid.

The third difference is the CP area of the hat. There are two small triangles whose reference points were not clear to me. I solved the problem in a very straight forward way. I ‘cut’ the hat area and substituted it with Joisel’s hat CP. The end result for the folded model is nearly the same. This is the new CP:


And finally, one last difference, only evident when you collapse the model. The arms turn to be too long. You can see it in the proof model I made before the final one (folded from a 35x35 cm square of Tant paper):


I found out two possible solutions. The first one, the obvious and simple, hiding part of the arm down the sleeve and the second one, more elegant but also more complex, trying to modify the CP. Again, if you compare the classical CP with the darf with diamonds CP you can see that there is one extra square in the face area (4 vs 3). We could remove the two horizontal lines used by this square and one vertical line in each side of the square. The grid becomes 30x30, the head grows and the arms shorten. Let us see the new CP:


The CP doesn’t work in the area around the red circles. The creases don’t reach the end of the paper. We have to remove an even number of divisions on each side to make it work. That means 2 on each side and 2 more at the bottom. Let us see the CP now:


If we remove the colored rectangles, and obviously move the fingers on the top right and left corners to the center area of the hat we get a valid CP with a 28x28 grid. The drawback is that we have shortened the legs in two units. But, instead of shortening the legs we can shorten the long shoes and hopefully make a nice model. I may try it with another dwarf. For this one I used the first modified CP with a 32x32 grid.

The collapsing process is not difficult but it is long, especially to make the skirt. Let us see some images.

Precreasing:


The collapsing begins in the head area:


Continues with the skirt:


And comes up with the final collapsed base. The skirt is three dimensional.


In order to close the back we put one edge of the skirt inside the other edge:


Here you can see the result. In this phase of the folding you don’t have to worry about closing the model yet. We will do it later, using, if we want, a drop of glue. Strictly speaking we don’t need to use glue because we are wet folding the paper and you can get the proper shape easily but, if you want to have a hard model that can withstand the passage of time I recommend using it.


We begin the modeling of the face helping us with clothespins to hold the model and tweezers for the small details:


In this case, instead of a hat we will model hair:


When we have finished the dry modeling, we dampen the dwarf for the first time with a water spray or simply splashing some water with the hand. We let it dry helping us with strings and clothespins so that it keeps the desired shape.


Here you can see the result once it has dried:


Then, we start folding and modeling the small details. I use a tiny brush to dampen the face and tweezers to help me model nose, mouth and eyes. Small clothespins are also a good help to keep the shape of these small details before they dry. In this phase of the modeling you can begin to use methylcellulose as a help to keep the shapes. It also acts as a soft glue that, for example, helps to close the sides of the mouth perfectly:


And finally, we get to the point in which we can glue the model to the base (I use carpenter’s glue). Most of the modeling is done but there are still some details remaining, especially in the arms area.


As you can see in the model, I have taken special care to bend the model a little bit to the right so that it seems to be moving. A straight model is not as dynamic as a bended model and it is more boring.

On the floor you can see the violin that I painted and folded in the idle time I had when waiting for the dwarf to dry. It was designed by Gen Hagiwara. Its folding diagrams were published in the 143 number of the Japanese Tanteidan Magazine. I will talk about violins, both this one and Joisel’s one, in my next post.

We put the violin in its place using carpenter’s glue and clothespins to hold the arm in the right position.


A little bit more modeling and we get the final violinist. You can see the four sides of the model. Its height is 17 cm and it is completely closed. Compared to my first dwarf (26 cm) it is smaller but most of the difference is due to the long hat the first dwarf wears. 


Monday, 17 February 2014

ERIC JOISEL’S ORIGAMI JAZZ BAND

Eric Joisel’s Origami Jazz Band has become one of the most spectacular compositions in origami. It is composed of 11 dwarves, each one with a different music instrument, flute, drum, violin, …. Using four different CPs you can get 4 different costumes, eleven different hats and 11 different faces.

The Great Origami Jazz Band (GOJB) by Eric Joisel in Zaragoza exhibition in 2013


Each dwarf is unique, one-of-a-kind, but the most important thing is not the fold but the final modeling of the paper, the curves, the face expression and the pose of the body with the instrument. Even Joisel said he was unable to repeat any of his models.

Eric Joisel passed away in 2010 without leaving clear instructions about how to make the models, only the base of one of the dwarves and sketches of  some instruments remain. The yet to finish work of dozens of origami artists all over the world has deciphered most of the models allowing other origami folders to give The Band a try.

A couple of months ago I decided to give this first step and as a result I came up with this model, a dwarf playing a clarinet.


As my first dwarf in the band I chose the ‘classical’ model. Its folding instructions where released by Eric Joisel himself in the French origami forum. You can see them here 


It is made with a 60x60cm 40g Kozo square paper. It is a paper made in Japan from long and strong plant fibers that make it very strong and flexible. Once I finished the base I started a long process, spanning several days, in which I wet folded every detail of the dwarf using water and methylcellulose. In some parts of the model  I used carpenter's glue to harden the paper, especially in the legs that support most of the weight of the model. After several cycles of wetting-modeling-drying I got the final model. The total height is 26 cm.

I learned about this paper in the beautiful Eric Joisel Exhibition hold in Zaragoza in 2013. It is the type of paper Joisel used in his last creations, Barbarians, Commedia dell'Arte,… but with less weight (40 g vs 90 g). Personally, I have tried other papers, triple silk, sandwich, Nicolas Terry foil, etc., but none of them has allowed me to get the details I was able to fold with Kozo. I bought my paper in a great paper shop in Madrid, La Dominoteria

Nicolas Terry's foil paper


Triple silk paper


The instrument, a clarinet, is made with the same paper, in this case a 12x4.5 cm rectangle painted with brown water color for the body and bronze acrylic for the keys. The CP was designed by the Bolivian master Ricardo Montecinos mimicking Joisel’s model. His web page is well worth a visit


Before folding the final clarinet, just 8 cm long, I made a preliminary model using foil paper. Here is my CP interpretation:

After folding the CP you get the collapsed base with 16 keys:


Here you can see the details of one of the keys:


We close the model locking the two sides of the paper together:


We model the mouthpiece:


We open the front part to form the bell:


And we get the clarinet:


Finally you can see the display I used to make the photographs of the models:


and two more photographs of the model showing the back and the right side: