Sunday, 21 June 2015

PICARUELO'S JAZZ BAND


January 2014. My smaller sister's birthday is coming. For a long time I have been thinking about giving an origami present to each member of my direct family, five brothers and sisters including myself, father and mother. I fold a tessellation and throw it to the dustbin, flowers but I don't like them. ¿an animal? Too conventional. I fold a Joisel's dwarf with double tissue paper but the end result is horrible.
Suddenly I think about the wonderful Eric Joisel's Exhibition in Zaragoza in 2013. He used a paper called kozo to fold most of his latter models. I find it and fold another dwarf. Yes, this time, I'VE GOT IT. It is a beauty worth to give as a present. I had already though about giving my next brother a Joisel's violinist so I have two of the presents solved. The project begins to take form in my mind.

I fold a clarinet, glue it to the dwarf and voila, the 7th of February I give it to my sister. It is a complete success. In a private letter I explain her the project and ask her to keep silent about it.

The same day is also the birth of my blog PICARUELO'S ORIGAMI. I pretended it to talk about different origami subjects but for now due to lack of time has been devoted to this project.


I have one month left for the next birthday. I start my second musician, the violinist. The first one was harder because I didn't know the paper and how to work with it, In spite of it, the last days before the 5th of March are very busy designing a violin, writing the blog and shaping the dwarf. The 5th of March I give it to my brother. Another success. This dwarf is still one I specially like.


One month left. The 18th of May. My father. I decide to go for the saxophonist. The hardest part is the instrument. After a one long day work I find a solution. I fold a proof model. It will work. Desperately looking for gold like paint I discover the acrylic gold colour. Just in time the 18th of August I give the present. The project begins to be clear for the rest of the family. Even so, I and the three dwarf owners keep silent.

Finally I enter a period of relative calm. My next date is the 25th of July. The bad thing is that after that date, there comes the 26th of July and then the 1st of August. This time  I will work in parallel folding the three models at the same time. This is how the flautist and the bandoneonist for my older sister and brother and the cymbal player for me come to life.

The schedule becomes very tight but in a final sprint I finish on time.


Only one left, my mother the 23rd of August. She already knows she will have her own dwarf. In spit of the summer holidays I manage to fold it on time. It is one of my preferred dwarves, the bass player:

This is how I came to the 23rd of August with seven dwarves and no more compromises. I could spend some time thinking about new things. After folding dwarves from 5 different CPs I had enough experience to try my own models. I already knew the box pleating technique from the wonderful Robert Lang's book, 'Origami Design Secrets' . My first design was the drummer a model I like more and more as days go by:

After my first new dwarf I go after my second goal, a woman. This is how I design my Milady. After adding a trombone she becomes the trombonist:

The months have run away fast. It is March 2015. I have two new deadlines, two exhibitions organised by the EMOZ, the Zaragoza Origami Museum. At the end of June there will be an exhibition about Spanish folders and creators in Zaragoza and in April there will be another exhibition in the Printer Museum in Madrid. It is a good chance to exhibit the whole band. In the end I choose Madrid, my city. In just one month I have to design and fold two new musicians, the sousaphonist and the harpist.
I give the sousaphonist to my older son. He contributes to the model folding the little crane standing on top of the left shoe:


I give the harpist to my younger son who also contributes to the model folding the blue 'pajarita' standing beside the harp:


One week before the day I had to take my models to the museum I begin to gather all the dwarves. The day before the deadline I finally manage to get all of them together.

I spend the night of the 24th to the 25th of April at home photographing the complete band.

This is the result of all this work:

During this year I have had the help of a lot of people, the majority origamists. Thank you to all of them. I also want to thank the people that have created or deduced some of the models I have used for my band:
And of course, infinite thanks to the great master Eric Joisel, my great inspiration to launch this project.

From the 25th of April the band is on exhibit in the Printer Museum in Madrid. For several months it will receive the visit of many people. Even the Madrid public television, Telemadrid, made a visit to the exhibition and immortalised the saxophonist. The 30th of August the dwarves will return to their owners waiting for another opportunity to join again.

Preparing the family photo with a big blue sheet as background
And now what? Sure more folding and more posts in this blog. But this time with different subjects.

Monday, 8 June 2015

THE HARPIST

The last member of my music band is another woman, a harpist. For the first time I make a model sitting on a stool. This is the result:


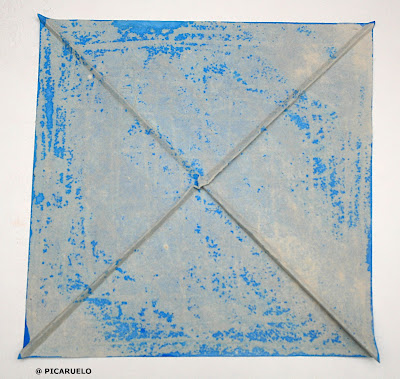
The harpist is a woman with pigtail hair and a design similar to the trombonist but sitting down instead of standing. At the bottom I add two feet coming from below the skirt. This is the CP:

The harpist design comes from a 36x36 grid. The central upper part has three flaps, the hair in the middle and the pigtails on each side. They are edge flaps because I needed them to be thin and symmetric. This is what makes necessary to increase the size of the grid from 32x32 of the trombonist to 36x36 of the harpist. In the following drawing you can see the different parts of the CP highlighted with colours:


In red, the hair. The pigtails in yellow. In blue, the four flaps that make the face. Around the face, in green, a one division wide river. It separates the face from the rest of the head. It adds one division length to the hair and to the neck. In pink a two wide divisions river that crawls around the head to form the neck. In orange, a rectangle that forms the breast. At the bottom, two flaps, three divisions long, that form the feet.

Collapsing this model is easy and similar to the trombonist or the drummer. The challenge is modelling the skirt and placing the model in a natural sitting pose. Here are some pics of the process:


Harpist bottom after applying methyl cellulose and letting it dry
The only advice I can give to model the skirt is to be patient and to use a lot of methyl cellulose. In the last photograph you can see a little trick I used to make rounded curves around the skirt and feet. I made little balls of paper dipped in methyl cellulose and placed them behind the skirt and inside the feet. I also used this trick to model the breast.

Let's go now to the stool . When I though about the harpist I didn't give much importance to the seat. When the time came to fold it I doubted between several models in the origami literature but none of them convinced me. So, I decided to make my own design: Surfing the web I found a very nice stool design:
'Chipboard' stools by Dana Oxiles are an 'attempt to elevate a humble material so that it is read as a chair before being read as sustainable' ; photo by Armando Rafael
It was elegant and easy to copy in origami. It didn't take me long to find a solution:

The hardest part of the model are the circular arches coming from the four corners on top of the stool. You have to be very careful to fold them precisely to obtain a good finish. Let us see some photographs I made with a proof model before folding the final stool.

We start with a square:
We fold the three parallel lines along both diagonals. In the  centre we make a Kawasaki rose twist fold.

We make a template with the form of the circular creases:

We use the template to draw the circular folds on the back of the paper:

We precrease the circular creases and unfold:

We collapse the stool as if it were a rectangular prism. First we crease the top square and then close the four sides. In the following pic you can see one of the sides before closing it:

We close the sides hidding the extra paper at the bottom and then fold the circular creases. In the photograph you can see the clothes-pegs I used to hold the model until it got dry as I was wet folding the model:

The final stool:

By changing the size of the top square you can make it taller or shorter. In my final model I chose a tall one:

Bottom view of the model, in the centre you can see the Kawasaky rose twist
The third part of this model was the instrument, the harp. I must confess that until I finished the model I didn't trust to have a nice result. That is one of the reasons for folding this musician the last. For me, a harp must have strings. The problem is that a harp with very thin strings from one sheet of paper is, I think, impossible to achieve. I opted by a modular approach. For the harp frame I would use the CP brilliantly deduced by Ricardo Montecinos from Eric Joisel's original model and for the strings, very thing strips of paper.

Here is the harp CP:

Let us see some steps of the collapsing process on a proof model:


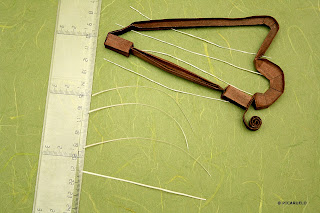
And here the final model I folded from a 50x4.17 cm kozo paper painted with brown water colour. You can also notice the thin strips of paper that will form the strings:


Finally, as a tribute to traditional origami I have added one 'pajarita'. In my last musician I added one crane as a tribute to the Oriental origami. Now in this musician I add a 'pajarita' as a tribute to the Western origami:

With the four models folded, musician, stool, harp and pajarita, we proceed with the final assembly. You can see the end result here:


And finally, with my eleven musicians completed I can proceed with the last part of my project: putting them together for the family photo.